> ## Documentation Index
> Fetch the complete documentation index at: https://docs.apten.ai/llms.txt
> Use this file to discover all available pages before exploring further.
# Custom Notifications
> Set up custom notifications to get alerted when important events happen in lead conversations.
## Overview
Custom notifications let you define alerts that fire when Apten detects a specific condition during a conversation with a lead. Instead of manually reviewing every conversation, you can have Apten watch for the moments that matter most and notify your team automatically.
Common use cases include:
* Lead expresses high buying intent or readiness to purchase
* Lead requests to speak with a human
* Lead mentions a competitor
* A compliance-sensitive topic comes up in conversation
## How It Works
1. **Define a notification** with a name and a plain-English condition
2. **Apten monitors every conversation** and evaluates your conditions automatically
3. **When a condition is met**, your team is notified via email (and optionally via [webhook](/webhooks/notification-created))
## Step 1: Create a Custom Notification
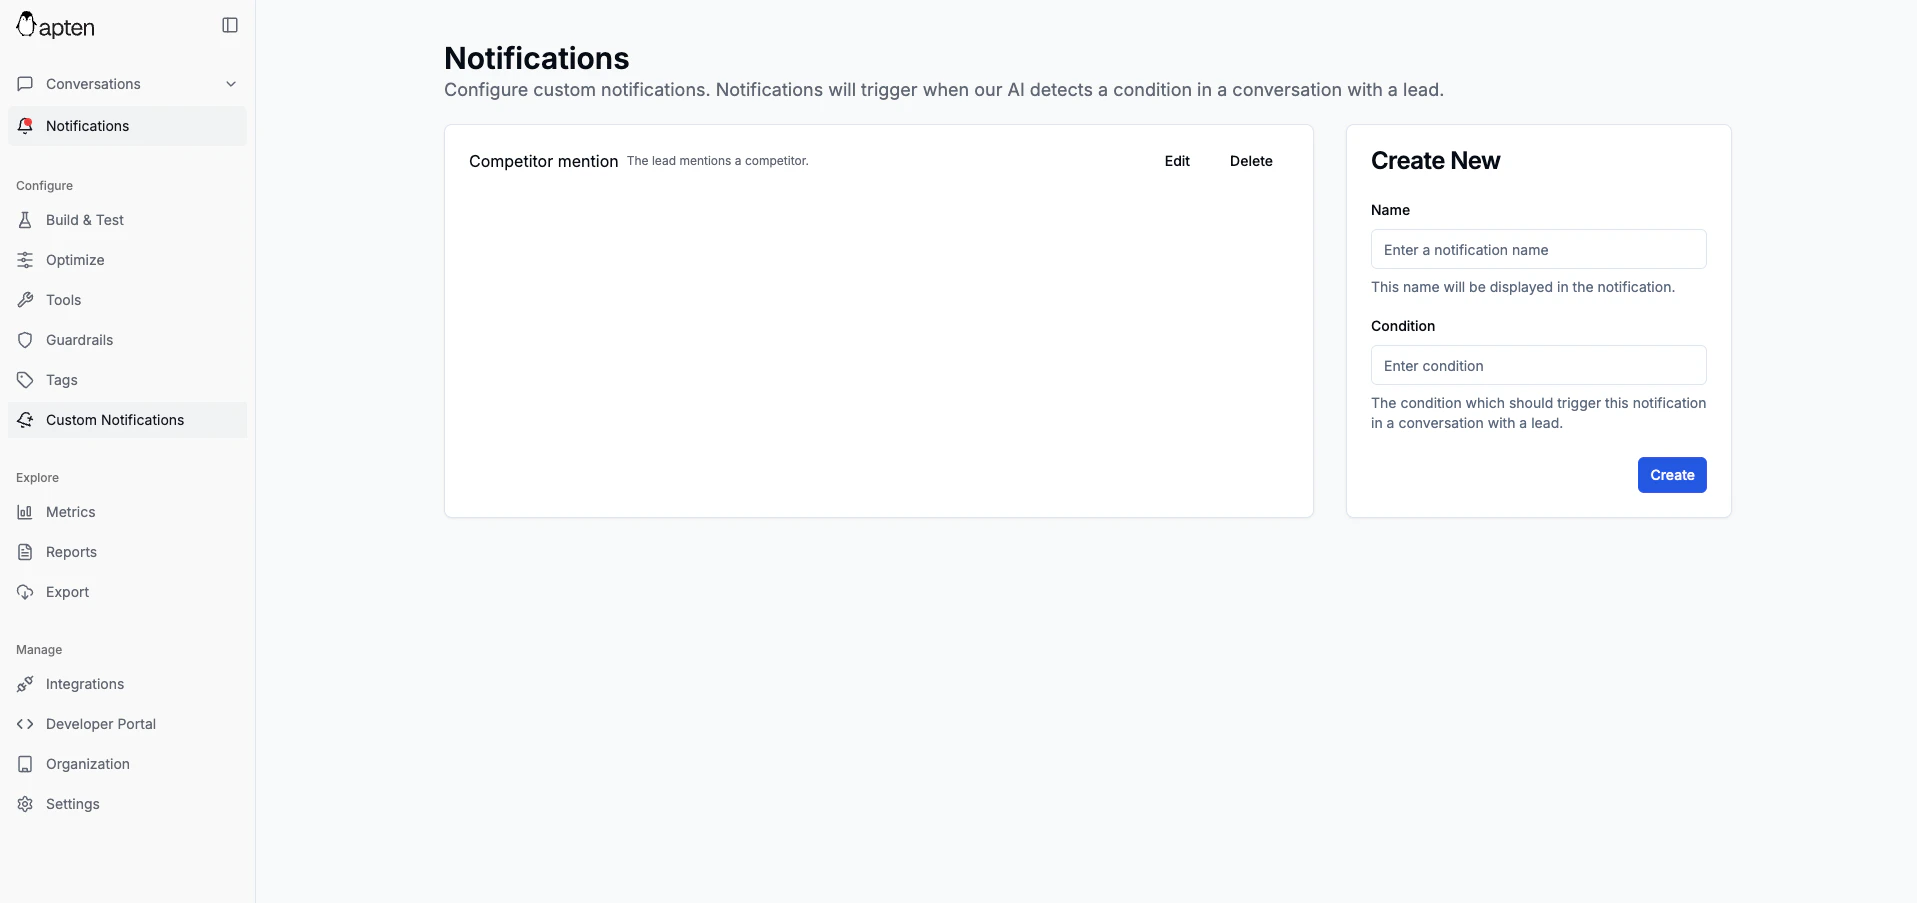
1. Navigate to the **Notifications** page in the sidebar
2. In the **Create New** panel, fill in:
* **Name** — a short, descriptive label (e.g., "Demo Request" or "Competitor Mention")
* **Condition** — a plain-English description of when this notification should fire
3. Click **Submit**
Conditions are written in natural language. Apten interprets them automatically — no code or special syntax required.
**Example conditions:**
* "The lead asks to speak with a human or requests a callback"
* "The lead expresses interest in scheduling a demo or meeting"
* "The lead mentions a competitor by name"
* "The lead shares a budget or price expectation"
 Only admin users can create, edit, or delete custom notifications.
## Step 2: Configure Email Delivery
By default, all notifications are sent to the email addresses configured for your organization.
1. Go to the **Settings** page
2. Add recipient email addresses in the **Notification Emails** field
3. Optionally, toggle **Filter Notifications** to choose which specific notifications trigger emails — useful if you only want certain alerts delivered to inboxes
## Step 3: Monitor Notification Activity
You can track how your notifications are performing in the **Metrics** page:
* **Notification chart** — shows how often each notification fires over time
* **Events table** — lists individual notification events with the lead's name, phone number, notification type, and the message that triggered it
This helps you fine-tune your conditions and understand which alerts are most valuable.
## Managing Notifications
You can edit or delete existing notifications at any time from the **Notifications** page:
* Click the **edit** icon to update a notification's name or condition
* Click the **delete** icon to remove a notification
Changes take effect immediately for all future conversations.
## Best Practices
1. **Be specific with conditions** — "The lead asks about pricing for the enterprise plan" works better than "The lead talks about money"
2. **Use descriptive names** — notification names appear in emails and metrics, so make them easy to identify at a glance
3. **Start small** — begin with 2-3 high-value notifications and expand over time. Too many alerts can cause notification fatigue
4. **Review metrics regularly** — if a notification fires too often, tighten the condition. If it never fires, the condition may be too narrow
5. **Combine with webhooks** — for programmatic integrations, configure a [notification webhook](/webhooks/notification-created) to push alerts to your own systems
Only admin users can create, edit, or delete custom notifications.
## Step 2: Configure Email Delivery
By default, all notifications are sent to the email addresses configured for your organization.
1. Go to the **Settings** page
2. Add recipient email addresses in the **Notification Emails** field
3. Optionally, toggle **Filter Notifications** to choose which specific notifications trigger emails — useful if you only want certain alerts delivered to inboxes
## Step 3: Monitor Notification Activity
You can track how your notifications are performing in the **Metrics** page:
* **Notification chart** — shows how often each notification fires over time
* **Events table** — lists individual notification events with the lead's name, phone number, notification type, and the message that triggered it
This helps you fine-tune your conditions and understand which alerts are most valuable.
## Managing Notifications
You can edit or delete existing notifications at any time from the **Notifications** page:
* Click the **edit** icon to update a notification's name or condition
* Click the **delete** icon to remove a notification
Changes take effect immediately for all future conversations.
## Best Practices
1. **Be specific with conditions** — "The lead asks about pricing for the enterprise plan" works better than "The lead talks about money"
2. **Use descriptive names** — notification names appear in emails and metrics, so make them easy to identify at a glance
3. **Start small** — begin with 2-3 high-value notifications and expand over time. Too many alerts can cause notification fatigue
4. **Review metrics regularly** — if a notification fires too often, tighten the condition. If it never fires, the condition may be too narrow
5. **Combine with webhooks** — for programmatic integrations, configure a [notification webhook](/webhooks/notification-created) to push alerts to your own systems