> ## Documentation Index
> Fetch the complete documentation index at: https://docs.apten.ai/llms.txt
> Use this file to discover all available pages before exploring further.
# Tags
> Learn how to create and manage tags to organize and categorize your leads
## Overview
Tags let you label and categorize your leads. You can use them to track lead status, segment conversations, filter exports, and trigger webhooks. There are two types of tags:
* **Manual tags** — applied by you or your team directly on a conversation
* **Condition-based tags** — applied automatically by Apten's AI when a conversation meets a condition you define
## Creating a Tag
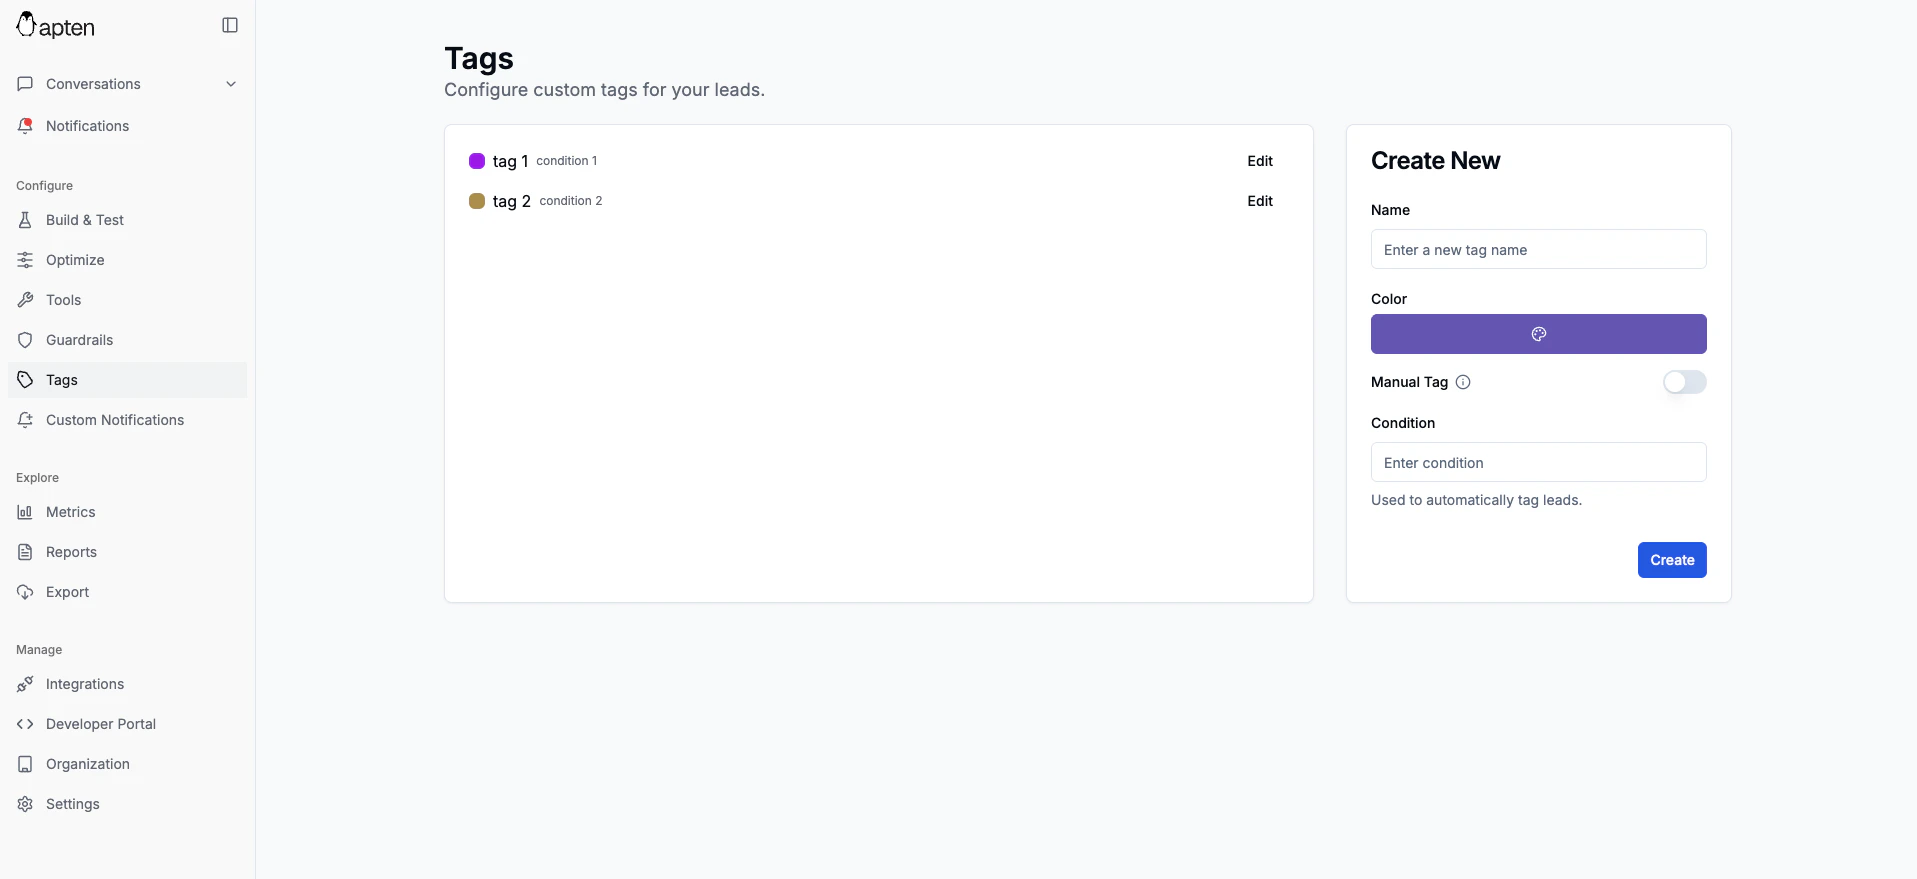 1. Go to **Tags** in the left sidebar
2. On the right side of the page, fill in the following:
* **Name** — a label for the tag (e.g., "Interested", "Scheduled", "Not Qualified")
* **Color** — pick a color to visually distinguish the tag
3. Choose whether the tag is **manual** or **condition-based**:
* **Manual**: Toggle the manual switch on. You'll apply this tag yourself from conversations.
* **Condition-based**: Leave the manual switch off and enter a **condition** — a plain-English description of when the tag should be applied.
4. Click **Create Tag**
For condition-based tags, write the condition as a natural language statement. For example: "The lead has expressed interest in scheduling a tour" or "The lead mentioned they have a budget over \$500k". Apten will evaluate each conversation against this condition and apply the tag automatically.
## Managing Tags on Leads
1. Go to **Tags** in the left sidebar
2. On the right side of the page, fill in the following:
* **Name** — a label for the tag (e.g., "Interested", "Scheduled", "Not Qualified")
* **Color** — pick a color to visually distinguish the tag
3. Choose whether the tag is **manual** or **condition-based**:
* **Manual**: Toggle the manual switch on. You'll apply this tag yourself from conversations.
* **Condition-based**: Leave the manual switch off and enter a **condition** — a plain-English description of when the tag should be applied.
4. Click **Create Tag**
For condition-based tags, write the condition as a natural language statement. For example: "The lead has expressed interest in scheduling a tour" or "The lead mentioned they have a budget over \$500k". Apten will evaluate each conversation against this condition and apply the tag automatically.
## Managing Tags on Leads
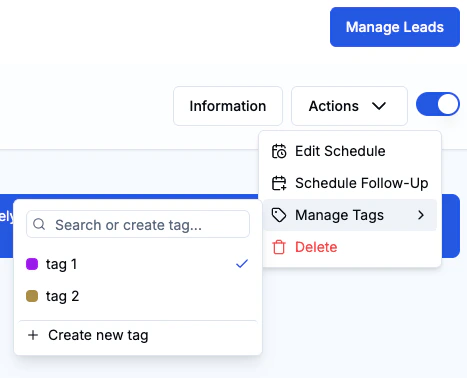 You can add or remove tags directly from any conversation:
1. Open a conversation from the **Dashboard**
2. Click the **Actions** dropdown button at the top of the conversation
3. Select **Manage Tags**
4. Search for and select tags to add, or click an applied tag to remove it
You can also create new tags on the fly from the Manage Tags menu without leaving the conversation.
Tags appear as colored badges on each conversation card, making it easy to see how leads are categorized at a glance.
## Tag Metrics
Track how often tags are being applied over time from the **Metrics** page. Select the tags you want to monitor to see a chart of tag activity across a date range. This is useful for tracking trends like how many leads are being qualified or expressing interest over time.
## Integration Sync
Tags can automatically sync to your CRM when an integration is connected. Apten supports tag syncing with:
* **Salesforce**
* **HubSpot**
* **Dynamics 365**
To enable tag sync, go to **Integrations**, select your connected CRM, and toggle tag syncing on in the integration settings. See [Integrations](/integrations/salesforce) for more details.
You can add or remove tags directly from any conversation:
1. Open a conversation from the **Dashboard**
2. Click the **Actions** dropdown button at the top of the conversation
3. Select **Manage Tags**
4. Search for and select tags to add, or click an applied tag to remove it
You can also create new tags on the fly from the Manage Tags menu without leaving the conversation.
Tags appear as colored badges on each conversation card, making it easy to see how leads are categorized at a glance.
## Tag Metrics
Track how often tags are being applied over time from the **Metrics** page. Select the tags you want to monitor to see a chart of tag activity across a date range. This is useful for tracking trends like how many leads are being qualified or expressing interest over time.
## Integration Sync
Tags can automatically sync to your CRM when an integration is connected. Apten supports tag syncing with:
* **Salesforce**
* **HubSpot**
* **Dynamics 365**
To enable tag sync, go to **Integrations**, select your connected CRM, and toggle tag syncing on in the integration settings. See [Integrations](/integrations/salesforce) for more details.