

Overview
Actions are the steps that do the work in an automation. They come in two groups in the Add step dialog:- Apten Actions — operate on leads in Apten.
- CRM Actions — look up a record in your connected CRM and expose its fields to later steps, or write field updates back to a record.
The find-then-act pattern
Most Apten actions need an Apten lead ID to know which lead to operate on. The standard pattern is to start with a Find Lead step, then reference its output in later steps: type / in the Apten lead ID field and pick the Find Lead step’s Apten lead ID output. A Create Lead step works the same way — later steps can reference the ID of the lead it just created.Apten Actions
Find Lead
Looks up an existing Apten lead by CRM record ID, Apten lead ID, or phone number. Provide at least one; if you set multiple, they’re tried in order — Apten lead ID → CRM record ID → Phone — and the first match wins, which makes a useful fallback chain. Outputs include whether a lead was found, the Apten lead ID, name, phone, email, customer profile, and status flags such as whether the lead has replied, is marked hot, or has unsubscribed. Pair it with a Filter step on the Lead found? output to stop runs for unknown leads.Create Lead
Creates a new lead in Apten and starts outreach. Required fields: First name, Phone, and Customer profile. Optional fields include Last name, Email, and Link to CRM record — set the link so the new lead syncs back to the CRM record that triggered the run (typically{{trigger.Id}}).
Under Advanced you can also set:
- Time zone — an IANA identifier like
America/New_York. If your CRM doesn’t store time zones in this format, add a Resolve Timezone step first and reference its Timezone output here. - Scheduled import time — defer Apten’s first outbound message until a future timestamp (up to 365 days out)
- Outbound phone — override the phone number Apten texts from
- Custom fields — extra key-value data stored on the lead
The keys
integrationSource, salesforceId, and dynamicsId are reserved — use the Link to CRM record field instead.Turn Off Lead
Pauses outreach for a lead — Apten stops sending messages until the lead is turned back on. Takes an Apten lead ID (not a CRM record ID).Turn On Lead
Re-enables outreach for a lead that was previously turned off — Apten resumes sending messages. Takes an Apten lead ID (not a CRM record ID).Send Message
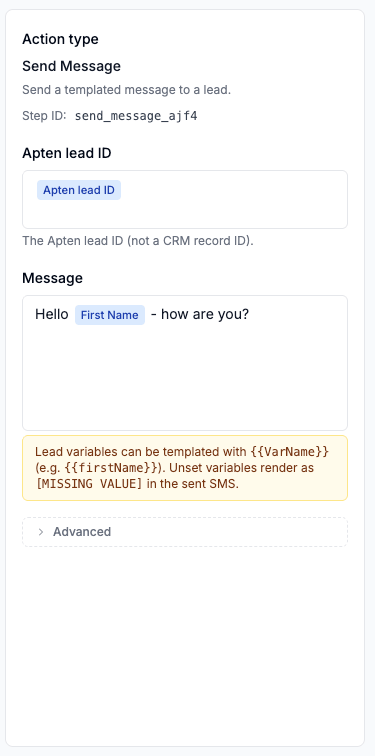
Sends a text message to a lead. Fields:- Apten lead ID — the lead to message.
- Message — the message body. Besides / references to trigger and step data, you can template lead variables with double braces, e.g.
{{firstName}}. Variables with no value render as[MISSING VALUE]in the sent message, so make sure the fields you reference are set.
- Scheduled time — send at a future time instead of immediately
- Send when lead is off — deliver even if the lead is currently turned off
- Schedule follow-ups — have the AI continue following up after this message
- Override business hours — send outside the lead’s business hours; otherwise delivery waits for the next window
Switch Profile
Moves a lead to a different Customer profile. Under Advanced you can Clear memory (start the conversation fresh) and Send a message after switch, optionally with a Delay before message in hours or minutes. Follow-ups (followUps) sets what happens to the lead’s scheduled messages:
- restart (default) — cancels pending scheduled messages except manual ones, deletes the first-message schedule, and resets the lead to step 1 of the new profile’s follow-up cadence. Nothing is scheduled by the reset itself. With Send a message after switch off, the lead has no pending outreach until its next interaction. With it on, the new profile’s first message goes out after the delay and the cadence continues from there.
- continue — keeps callbacks, call and event reminders, manual messages, follow-ups a user scheduled for a date, and the first-message schedule. The pending automated follow-up is replaced with step 1 of the new profile’s cadence, starting now; if one of those messages is pending, the cadence continues after it sends. A lead not contacted yet gets its first message under the new profile. Stopped leads and leads in long-term follow-up are left as they are. If the new profile has follow-ups disabled, automated follow-ups are canceled and follow-ups stop, even for long-term leads. Can’t be combined with Send a message after switch.
With Follow-ups set to restart, switching profiles cancels any pending scheduled follow-up for the lead (manually scheduled messages are preserved) and resets its step to 1 of the new profile’s cadence. Send a message after switch is off by default — if you leave it off, no new follow-up is scheduled, so the lead has no pending outreach until some other event re-triggers follow-up logic (e.g. the lead replies, or a later step/automation schedules a message). The reset does not schedule anything by itself. Turn on Send a message after switch if you want the new profile to reach out on a delay after the switch.
Add Context
Appends information to a lead for the AI to use. Provide at least one of:- Context — free-text background, e.g. notes from the CRM record
- Command — an instruction for the AI, e.g. “Schedule a follow-up for tomorrow at 9am.”
- Custom fields — key-value data stored on the lead
Add Tags
Adds one or more of your organization’s tags to a lead. Pick the tags from the Tags dropdown — every tag defined in your organization is available, including tags marked as manual-only (that setting only controls what the AI can apply on its own). Adding a tag the lead already has is a no-op. If you’ve configured tag syncing for your CRM, tags added here sync to the linked CRM record the same way as tags applied anywhere else in Apten.Remove Tags
Removes one or more of your organization’s tags from a lead. Removing a tag the lead doesn’t have is a no-op. Works with tag syncing the same way as Add Tags.Register DNC
Adds a phone number to your organization’s Do Not Contact list, blocking all future outreach to it across every lead. A common pattern is to reference the Phone output of a Find Lead step.Registering a number on the DNC list blocks outreach to that number but does not turn the lead off. Pair Register DNC with a Turn Off Lead step to do both.
Resolve Timezone
Converts location data you already have into a time zone Apten can use — so leads are contacted at the right local hours even when your CRM doesn’t store time zones. Provide at least one input; if you set multiple, they’re tried in order — Timezone value → Zip code → Phone → State — and the first match wins. A value the step doesn’t recognize isn’t an error; it just falls through to the next input.- Timezone value — a field that already holds time zone information, in any common format: an IANA identifier (
America/New_York), a Dynamics Time Zone field (the numeric codes those fields store bind directly), or a Salesforce/Microsoft time zone label like(GMT-08:00) Pacific Standard Time (America/Los_Angeles)or(UTC-08:00) Pacific Time (US & Canada). - Zip code — US zip codes, five-digit or ZIP+4. Leading zeros stripped by numeric CRM fields or spreadsheets are repaired automatically (
2108is read as02108). - Phone — US and Canada numbers; the time zone is inferred from the area code. Toll-free numbers carry no location, so they’re skipped.
- State — a US state, territory, or Canadian province, as a full name or abbreviation in any casing (
California,CA,ca). States spanning two time zones use the zone where most of the state’s population lives.
If none of the inputs resolve, later steps still run: a Create Lead step referencing the Timezone output simply creates the lead without a time zone, and outreach follows your organization’s default hours. A miss never blocks lead creation.
Abbreviations like
EST and bare GMT/UTC offsets are deliberately not recognized — they’re ambiguous or unreliable across daylight saving — and fall through to the next input instead.CRM Actions
The CRM is fixed when you add the step (each connected CRM appears as its own entry in the Add step dialog, e.g. Find Salesforce Record or Update Dynamics Record). To target a different CRM, delete the step and add the other variant.
Find CRM Record
Looks up a single record of any object in your connected CRM — for example, the Account behind the Contact that triggered the run, or a lead’s next appointment — and exposes its fields to later steps.- Object — the CRM object to search.
- Search by field / Search value — the record is looked up where this field equals the value; typically an ID or lookup field referencing the trigger record, e.g.
{{trigger.AccountId}}. - Conditions (optional) — extra conditions the record must meet on top of the search match. Supports condition groups for mixed AND/OR logic.
- If multiple match, pick the record with… — a tie-breaker: choose a field and lowest or highest (for example, lowest start date = the soonest upcoming appointment).
Update CRM Record
Writes field updates to an existing record in your connected CRM. The classic use is writing back to the record that triggered the run — for example, stamping the new lead’s Apten lead ID onto the CRM record after a Create Lead step.- Object — the CRM object the record belongs to.
- Record ID — the record to update; typically the trigger record’s ID, e.g.
{{trigger.Id}}. - Field updates — up to 20 field/value rows. The value input matches the field’s type: text, number, Yes/No, a picklist of the field’s options, or a date picker. Text and number values can reference trigger and step data with /.
Relative date values
Date and date/time fields offer two value modes:- Specific date — a fixed date or time.
- Relative to now — the moment the step runs, plus or minus an offset: current date, 5 hours from now, 3 days ago. Use an offset of 0 to stamp the current date or time — for example, an “Entered Apten” date field set to current date.
Read-only fields and lookup/reference fields can’t be updated and don’t appear in the field picker. If the record ID doesn’t match an existing record, the step fails — use Find CRM Record with a Filter on Record found? first if the record might not exist.