

Overview
Control steps shape the flow of a run instead of performing work:- Filter — stop the run unless conditions match.
- Delay — pause the run for a set amount of time before continuing.
- Branch — split the automation into multiple paths, each with its own rules and steps.
Filter
A Filter step checks its conditions when the run reaches it. If they match, the run continues to the next step; if not, the run stops there with the status Halted. Filters can reference anything available at that point in the run — trigger fields and the outputs of earlier steps. A common pattern is a Find Lead step followed by a Filter on its Lead found? output, so the rest of the automation only runs for leads that exist in Apten.Halted is not an error. It means a Filter (or Branch) decided the run shouldn’t continue — exactly what you built it to do. Halted runs are listed on the Runs page so you can confirm your filters behave as expected.
Delay
A Delay step pauses a run for a set amount of time, then continues to the next step. Enter a positive whole number and choose Minutes, Hours, or Days. Each Delay can last from 1 minute to 30 days. You can place a Delay anywhere in an automation, including inside a branch. An automation can include up to 30 days of delays in total. Apten adds the duration of every Delay in the automation, including Delays in separate branches, because every matching branch runs in order. A common pattern is to wait before acting on a CRM record: add a Delay, use Find CRM Record to fetch the record’s latest values, add a Filter to confirm it still matches, and then perform the action.While paused, the run has the status Waiting and shows when it will resume. If the automation is off or deleted when the Delay ends, the run halts instead of continuing. See Runs & Troubleshooting for details.
Branch
A Branch step splits the automation into 2 to 5 branches. Each branch has its own Branch rules (conditions) and its own chain of steps.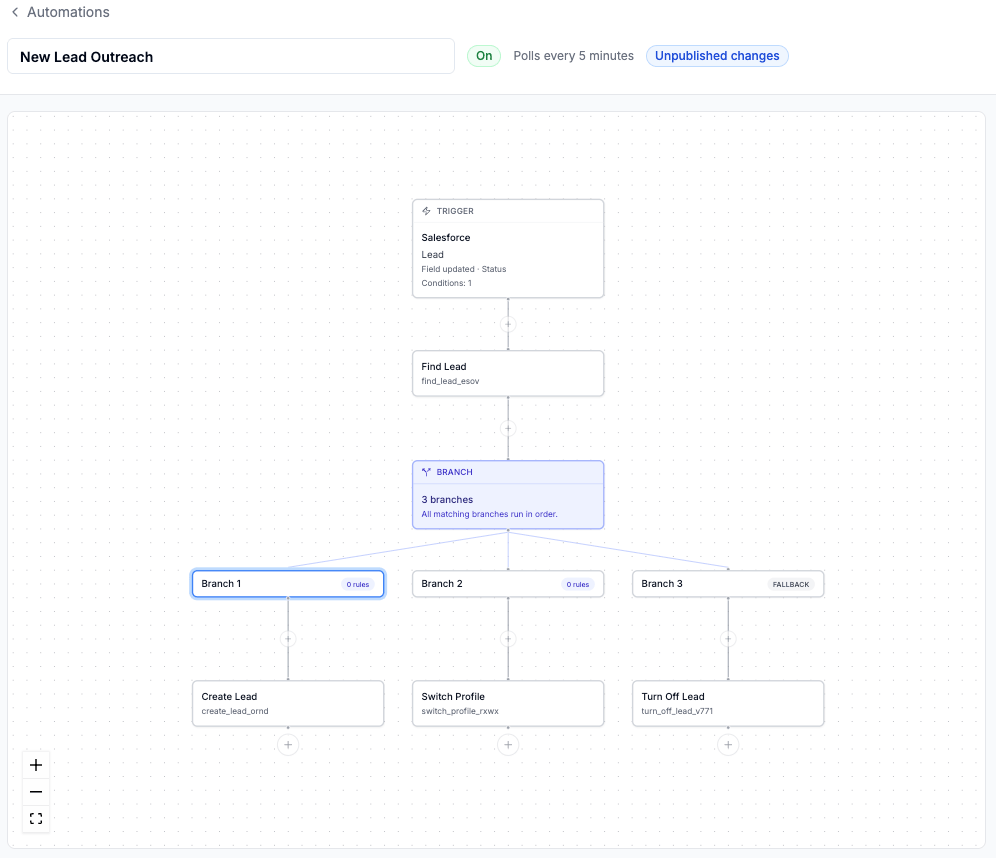
- Every branch whose rules match runs, one after another, in the order the branches are defined. Branches are not mutually exclusive — if a record matches two branches, both run.
- One branch can be marked as the Fallback branch. It has no rules and runs only when no other branch matched.
- If no branch matches and there is no fallback, the run stops with status Halted.
- If a step inside one branch fails, the other matching branches still run, but the run’s overall status is Failed.
- A Branch is always the last step of its chain — branches don’t merge back together, and each branch runs to its own end.
- Branches can contain their own Branch steps, nested up to 3 levels deep. Each chain (the top level, or a branch) contains at most one Branch step, always at its end.
- Each branch can hold up to 10 steps, and the Branch step itself counts as one — a chain that ends in a Branch has room for 9 other steps.
The Condition Editor
Conditions appear throughout Automations — trigger Conditions, the Watched field filter, Filter conditions, Branch rules, and the optional conditions on Find CRM Record — and they all work the same way. Each condition is a row of three parts:- Field — searchable dropdown of available fields
- Operator —
=,≠,contains,>,<,in,not in,is set,is not set(the list adapts to the field’s type) - Value — a typed input matching the field: text, number, Yes/No, a picklist of the field’s options, or a date picker.
in/not inaccept multiple values.
Condition groups
To mix AND and OR logic, add a group. A group is a set of conditions with its own AND/OR operator, evaluated as a single condition in the outer list. For example, Status = Qualified AND (Source = Web OR Source = Referral) is the outer list combined with AND, containing a group combined with OR.- Click Add group in the condition editor to create one; add conditions to the group with its own Add condition button.
- A group needs at least one condition, and groups can’t contain other groups — one level of grouping keeps the logic easy to read.
- Groups work on every condition surface: trigger Conditions, Filter conditions, Branch rules, and Find CRM Record conditions. (The Watched field filter stays a single condition.)
Relative dates
On Filter, Branch, and Find CRM Record conditions, date fields offer two value modes:- Specific date — a fixed date or time
- Relative to trigger — an offset from when the run fired, e.g. 3 days after trigger or 2 hours before trigger. Use
>and<with relative dates, e.g.AppointmentDate < 2 days after triggerto mean “within the next 2 days.”